Three months ago already, we posted our new year's wishes and introduced our sweet new four-wheeled partner. We already explained (even though in another language) the reasons that led us to sell the TRANSITion! and put a 2c15 in our life.
 |
| a rare shot showing c15's amazing skills of mimicry in snowy garden. |
"- Peter? No way he makes it to the pub tonight ; must be at home with a bowl of soup and blanket.
- Poor thing! He alright? Has he got a flu?
- Nooo, he doin' fine. Guess it's only the average little, ye know, seasonal sedentarity.
- Oh, I see. Not abig deal..."
 |
| on the day we moved in: garden, snow and neighbours' cabbages. |
Okay, so we found this lovely small apartment in an old police barracks from the mid-XIXth century (much less weird as it sounds), with a little garden and a river, in a nice village at the crossroads of three valleys. Looking south, a lot of sun, quiet place surrounded only by mountains and not too far from civilization... Sounds perfect, doesn't it? Rent is cheap and the few other flats in the building are held by retired couples who spend their days gardening their orchard plots. They are willing to teach us what they know (which actually is a nicer way to say that everytime they see us with a shovel or hoe, they need to let us know we're doing it the wrong way - this meaning not "the way they've been doing it for the last forty years"). But let's keep the gardening for later. For now, the point is: even we've settled down the un(t)raveling thing is still in progress. See by yourselves: we are in quite an untraveled place and we do have quite a lot of things to unravel together! This is still not about getting somewhere "physically". This is not a trip, remember? "Everyday is a journey and the journey itself is home".You can be traveling without moving, or moving without traveling. And everything that's in between is fine, too. After a first day spent cleaning, sanding and oiling the wooden floors of the livingroom and mezzanine, we started to work on some home basics: a bed, a desk and a something-to-store-kitchen-stuff-in-and-to-cook-on.
 |
 |
 |
 |
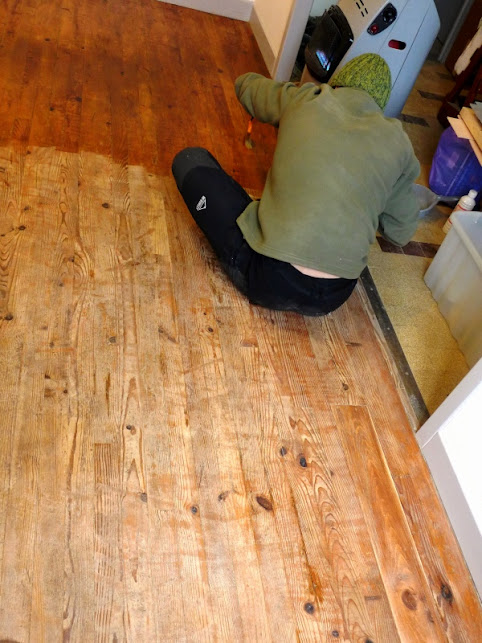
||
| very first step: the mezzanine before, during and after feeding it with natural 'hard oil'. | ||
Some people enjoy shopping online, or going to a mall on a busy saturday or spending a thursday night eating mini salmon sandwiches at their IKEA's. We do not. With all due respect to its customers, IKEA is something we pretty much want out of our lives: gigantic multinational brand, cheap design, uniformity worldwide, poor quality, more volume of packaging than of actual product inside and basically created on a single-use concept in order to make sure you'll rebuy the same stuff again and again: "buy it - build it - get tired of it - get rid of it". So, the question here is: why would you spend some money on a furniture you'll probably want to leave behind within five years, when you can have a lot of fun and learn a lot of skills just DIYing it at home for little more than free? The world is full of spare pieces of wood that will eventually rot in a junkyard or under the rain. Why not take some time to play with it? You may even get better at it as you explore and experiment. There's a whole lot of room to be creative, the internet is full of DIY videos, blogs and resources in case you get stuck with technical issues, and if you spend the money of any average IKEA item on a basic set of woodwork tools, you'll be able to fill a whole house with your creations, then your next house, then the next one!
Also... do we need to say that building your own bed as good old Ulysses did in Ithaca for his dear Penelope is damn hot! Even if, instead of carving it off a massive olive tree, you decide to upcycle a set of old pallets, it's still a pretty sexy thing to share with your partner. This bed is gonna be so much more than any awkwardly-named IKEA bed.
Also... do we need to say that building your own bed as good old Ulysses did in Ithaca for his dear Penelope is damn hot! Even if, instead of carving it off a massive olive tree, you decide to upcycle a set of old pallets, it's still a pretty sexy thing to share with your partner. This bed is gonna be so much more than any awkwardly-named IKEA bed.
Now we got you convinced, how does it work?
 |
| always up for a little taxonomy lesson! |
1- First, you need the pallets. Hunt them around any mall, store or warehouse. Asking first is the way to do! There are actually several sizes and qualities, all of which can be used for something: thin and clean for inside, thick and rough for garden projects. Your local dealers of appliances, gardening machines and/or aluminium doorframes will sure have some special, stronger and bigger pieces. Use a pied de biche (crowbar), hammer and pliers to remove the nails (they can be re-used too, ig not too rusty), classify and store your wood cautiously. Do not waste time sanding the pieces before you actually know what you're gonna use them for.
2- Then, you want to focus on a project, draw a sketch and do some measurements: what is it gonna be for? how strong does it need to be? will you sit on it? step on it? jump on it? do all these at the same time and with a bunch of friends? As we said, as a first priority, our mattress needed a bed frame. Then, we wanted a little desk to work on. Finally, since our apartment's kitchen had no equiment at all, we needed to figure out something to cook on and keep the kitchen stuff in: something that would allow storage and working surface,that would host the gas stove, that would be in the middle but could be moved easily (this is quite a bigger project and it's gonna need another post)...
 |
 |
 |
| Access backstage to the... wood stock festival! (the pied-de-biche is mandatory and some funky sandals sure help) | ||
3- If you lack imagination or you don't quite know how to, check on the Internet, because it's highly probable one thousand people already posted it somewhere or even made a tutorial on Youtube. Solve your doubts but don't miss an opportunity to do things your way: the raw material is free and the more mistakes you'll do, the more you'll learn!
4- The Bed Frame: we used some solid boards salvaged from the double-glazed windows shipping frames and decided to try a rudimentary, raw version of "mortise and tenon" mounting. We set up an extra board in the middle, with a central foot to host the half-width, shorter slats and hold the weight. We then attached (screws and glue) some thin bracket boards on the inside of the frame, to receive the slats, then cut and sanded them all. Only at the end were they nailed to the brackets. We nailed/screwed a pallet's wooden cube inside each angle of the frame and designed some strong feet out of bigger, stronger ones. Finally, the frame was given a protective layer of "hard oil", the same as we used for the floor.
 |
 |
 |
 |
| The mortise-and-tenon built frame, details of the feet (before and after oiling) and the completed slatted base. | |
5- The Bedhead: it is no more work than a short evening, and little more than a pair of pallets, sanded and recut at the correct size. We salvaged and selected some pallets with pieces of bark left, since we liked the "rustic" effect once sanded and oiled. Then, we thought it would be nice to have a small shelf to put some stuff onto, so we flipped three of the front boards to the back side and painted them green with the rest of colour from inside the 2c15. (water-based and so called eco-friendly, whatever it may mean). The rest of the bedhead was oiled and dried overnight: that's it! We first thought we would screw it to the bed frame but once in position, it appeared it was not really necessary. Easy to move for housework purposes.
 |
 |
 |
 |
||
| The bedhead story from a to z and the completed bed in situ: et voilà! | ||
6- The little desk: the main idea behind this one-day project was to use a pair of half-size pallets to make a "column" of storage and give a strong base for the computer weight. The other side received two (60x35mm) feet, linked together with a couple of brackets. The main board is made of 6 strong pieces pressed together with a sandwich structure, in order to make them as even as possible.
The result isn't quite leveled and would need a vigorous shaving with a plane, that we don't have and have never used so far... so this is on our bucket list : a skilled friend with a spare couple of hours to help us do it! We'll need a hand for the ongoing kitchen-thing project, so if anybody knows of anybody... Since the column was actually very deep (about 70cm), we improved it by opening an extra little storage on the side and closing it half way to the bottom (it may be clearer on the pictures). There were a few pieces left that came perfect to build and screw a storage to the feet on the other side, very useful for the pile of papers, letters and bills you don't want on the desktop... And as for now, that's it. Barnish or oil will be added after we plane the surface, which means, later on.
 |
 |
 |
| Hardest part of the process: defending the project in front of the validation commitee, then, just do it! | ||
 |
 |
 |
| the whole thing getting done, the secret little shelf on the side, the whole thing completed and ready to use. | ||
And that's all (for today) folks! Just a last useful tip: with a nice, strong, heavy pallet cube and anything suitable for an axe (here a strong plastic pipe stuffed with a branch and some nails to tighten the head), make your own joiner's mallet! It'll take 15 minutes, it'll work wonders and you'll need it for everything from fitting pieces together to using the wood chisels...
 |
| Thor's hammer? Noooo. It's a handy DIY joiner's mallet! |
hi guys, we are hitting the road again and we'll pass by your region, maybe a good time to meet! see ya
ReplyDeleteOups! just saw this right now, but got your FB message already. we should be home for the next week or so... just let us know when you're around! drive safe and see ya! :)
Delete